
Slow Bathroom Sink Drain: Safe Checks Before Chemicals
On this page
Quick answer
For one slow bathroom sink, first stop adding products, remove standing items, check whether the stopper opens fully, and lift away accessible hair or soap residue while wearing gloves. Observe whether the basin drains slowly from the start or backs up after several seconds. Stop if there is leakage, sewage, multiple affected fixtures, or an unknown chemical already in the drain; those clues justify professional help.
A slow drain is a symptom, not a diagnosis. The restriction may be at the stopper, in the trap, farther along the branch line, or part of a broader drainage or venting problem. Start with reversible surface checks and preserve accurate information for a plumber.
Lawrence Plumbing And Heating / lawrence plumbing
708 E Lake Ave, Baltimore, MD 21212, USA
Define the symptom before opening anything
Ask when the problem began, whether it is getting worse, and whether the sink was recently serviced. Run only enough water to observe the behavior. Note the delay before pooling, any gurgling, odors, bubbles, or change when another nearby fixture drains.
Check the cabinet, wall, floor, supply connections, and drain joints for moisture before and during a brief test. A leak under the sink needs attention before repeated flow testing. Do not loosen a trap simply because the basin drains slowly.
Test other fixtures briefly. Several slow or backing-up drains can indicate a shared branch or main-line issue. Stop using affected fixtures if water or sewage is returning through another opening.

coastal & son, llc / aj appliance toms river nj
Toms RiverOcean CountyNew Jersey
1106 Verdant Rd, Toms River, NJ 08753, USA
Clean the stopper and visible opening
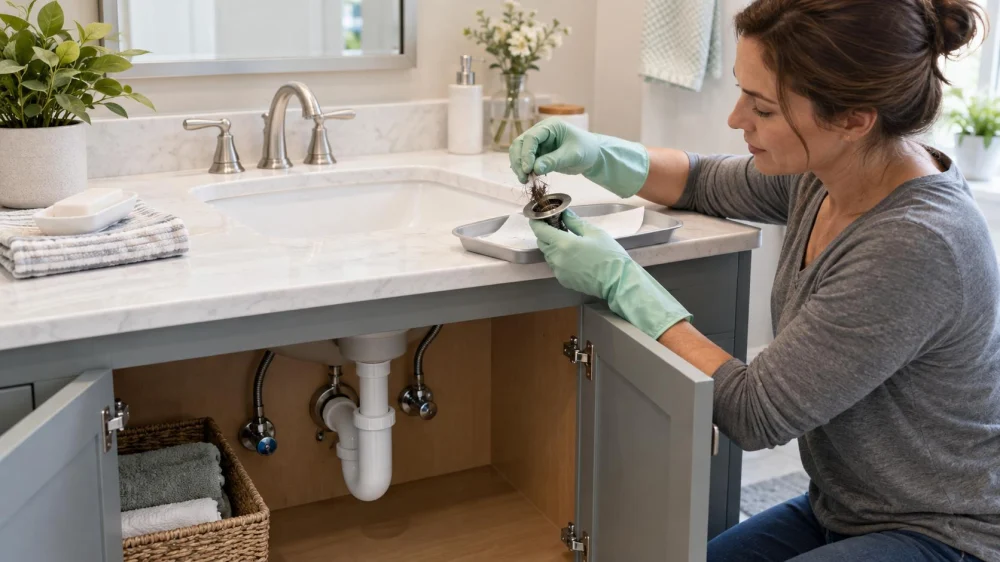
Put on household gloves and provide ventilation. Remove loose hair and residue that can be reached at the drain opening without pushing it deeper. Many bathroom sink stoppers lift or pivot differently, so consult the faucet or drain instructions before removing parts.
If the stopper is removable by its normal method, photograph its orientation and clean it over a lined container, not over the open drain. Keep small seals and fasteners accounted for. Reinstall it exactly as directed and confirm that it opens fully and seals correctly.
Do not insert sharp wire, powered equipment, or a tool that can scratch the finish, puncture piping, or become trapped. Never reach into a drain that may contain broken glass, a dropped sharp object, or drain cleaner.
Use flow clues to narrow the cause
Immediate pooling with a visibly restricted stopper can point to the drain opening. A sink that accepts water briefly and then slows may have restriction farther downstream. Gurgling or interaction with another fixture may involve venting or a shared drain, but sound alone cannot locate the cause.
Odor does not prove that the trap is blocked. Residue at the overflow channel, bacterial film, a dry trap in an unused fixture, or a drainage issue can smell similar. Avoid masking the clue with fragrance or mixing cleaners.
Write down what changed after surface cleaning. If flow returns and the cabinet remains dry, monitor it. If it remains slow, repeated home experiments can make later service more hazardous without identifying the restriction.
Follow a low-risk checklist
- Ask everyone what products or objects have entered the drain.
- Remove items from the cabinet and check for active moisture.
- Observe the stopper position and a short, controlled flow test.
- Briefly check whether other fixtures drain normally.
- Wear gloves and remove only accessible surface debris.
- Follow the product instructions if the stopper is designed for easy removal.
- Reassemble, run a brief test, and inspect every visible joint.
- Stop and call a plumber if the symptom persists or risk clues appear.
Understand chemical and tool risks
Caustic or acidic drain cleaners can injure skin and eyes, react with other products, damage some materials, and remain in standing water or piping. Never mix cleaners, and never add a second product to an unknown chemical. Tell the plumber exactly what was used, how much, and when.
A plunger or hand tool is not automatically safe for every sink. Overflow openings, fragile fittings, pop-up mechanisms, and existing chemicals change the risk. Powered drain equipment can damage piping and injure an untrained user.
If a product is considered, follow the pipe, fixture, septic-system, and product manufacturers' current instructions and warnings. A safer choice is often to pause and arrange mechanical diagnosis by a qualified professional.
Limitations and urgent situations
Stop using the sink and seek prompt help for sewage, water emerging from another fixture, an active cabinet or wall leak, a dropped hazardous object, chemical exposure, or several affected drains. For chemical contact, follow the product label and contact the appropriate poison-control or emergency service.
This guide covers preliminary checks for a typical US residential bathroom sink. Plumbing layouts, materials, local codes, septic systems, and service requirements vary. Concealed piping cannot be assessed from drain speed alone.
Sources and evidence notes
The approach reflects standard plumbing and chemical-safety principles: begin with visible, reversible checks; do not mix drain products; protect against unknown residue; check for leakage after disturbing any component; and escalate when several fixtures or sewage are involved. Product and fixture instructions take priority for specific parts.
Frequently asked questions
Can I pour boiling water into the sink?
Not by default. Very hot water can damage some piping, seals, finishes, or fixtures. Follow the manufacturers' temperature guidance.
Is baking soda and vinegar always safe?
No household mixture should be assumed compatible with existing chemicals, materials, or a septic system. Do not add it when the drain contents are unknown.
Should I remove the P-trap myself?
Only if the system and instructions make it an appropriate task and you can safely isolate, contain, reassemble, and leak-test it. Corroded, glued, concealed, or chemical-filled piping needs professional assessment.
Why does the sink gurgle?
Gurgling can accompany restricted drainage, air movement, or venting issues. Note when it occurs and whether other fixtures are involved; the sound alone is not a diagnosis.
When is a slow sink part of a larger blockage?
Multiple slow fixtures, water returning elsewhere, sewage odor with backup, or changes when another fixture drains make a shared-line problem more likely.
Conclusion and next steps
Begin with the stopper, visible debris, controlled observation, and a cabinet leak check. Avoid unknown chemicals and aggressive tools. If surface cleaning does not restore normal flow—or other fixtures, leakage, sewage, or chemical residue are involved—stop testing and give a plumber your notes, photos, and product history.

 IMP Plumbing & Heating Corp.4.0 (13 reviews)
 Best Yet Installations, Inc. - Plumbing, Appliance Installation & Electrical4.0 (822 reviews)
 Precision Plus4.0 (46 reviews)
 Tanner Plumbing & Heating5.0 (5 reviews)
 Martex Improvement LLC0.0 (0 reviews)
 Mav Mechanical LLC - Plumbing, Heating0.0 (0 reviews)
 Step-by-Step Guide to Replacing a Leaking Tub Drain Gasket
 How Often Should You Address Sump Pump Failure? Key Insights for Homeowners
 Why a Sink Gurgles When Another Fixture Drains
 Why Is My Toilet Flush Valve Leaking?
 Step-by-Step Guide to Low Water Pressure: Causes and Solutions
 How Much Does It Cost to Choosing the Right Pipe Materials for Your Project