
A Practical Home Fix for a Running Toilet: Replacing the Fill Valve Without Stress
- Understanding-the-problem-why-toilet-fill-valves-fail - Learn how a broken fill valve affects water flow, noise, and efficiency
- Tools-and-preparation-before-you-start - What you need to safely begin the repair at home
- Step-by-step-toilet-fill-valve-replacement - A clear walkthrough for replacing the faulty part
- Common-mistakes-to-avoid-during-installation - Real issues beginners run into and how to prevent them
- Real-home-scenario-and-lessons-learned - A relatable homeowner story showing why timing matters
- Maintenance-tips-and-long-term-toilet-care - How to prevent future failures and extend system life
- When-to-consider-upgrading-your-toilet-components - Knowing when replacement beats repeated repairs
Understanding Why a Toilet Fill Valve Breaks in the First Place
A toilet that keeps running or refilling randomly is usually dealing with a worn-out fill valve. This small component controls how water enters the tank after every flush. When it starts to fail, you may hear constant hissing, slow tank refills, or even water spilling into the overflow tube. Many homeowners ignore these early warnings, assuming it is a minor annoyance, but over time it can waste a surprising amount of water and increase utility bills.
In most residential homes, fill valves wear out due to mineral buildup, fluctuating water pressure, or simple aging. If you live in an area with hard water, the internal seals can degrade even faster. Understanding this helps you recognize why replacing the part is often more effective than trying temporary fixes.
Preparing for a Safe and Smooth Repair Process
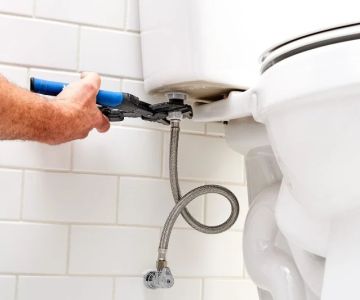
Before starting the replacement, it is important to shut off the water supply behind the toilet. This simple step prevents accidental flooding and keeps your workspace dry. Once the water is off, flush the toilet to empty most of the tank.
Having the right tools makes the process easier. Most homeowners only need an adjustable wrench, a sponge or towel for residual water, and a replacement fill valve compatible with standard toilet tanks. Choosing a high-quality replacement part is essential because cheaper models may wear out faster, leading to repeated repairs.
If you are unsure which model fits your toilet, checking the manufacturer details or tank size can save you frustration later. Some homeowners prefer upgrading to modern universal fill valves that adjust automatically, reducing long-term maintenance issues.
Step-by-Step Process to Replace a Broken Toilet Fill Valve
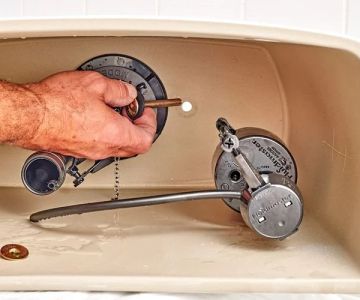
Step 1: Empty and Dry the Tank
After shutting off the water, flush the toilet and hold the handle down to remove as much water as possible. Use a sponge to soak up remaining water. A dry tank makes the replacement cleaner and easier to manage.
Step 2: Disconnect the Old Fill Valve
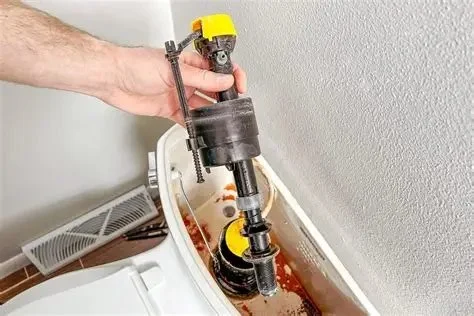
Locate the water supply line beneath the tank and carefully unscrew it. Inside the tank, loosen the locknut securing the fill valve. Once removed, lift the old unit out gently.
Step 3: Install the New Fill Valve
Place the new valve into the same opening and adjust the height according to your tank size. Secure it tightly with the locknut underneath. Make sure the refill tube is properly positioned toward the overflow pipe.
Step 4: Reconnect Water and Test
Turn the water supply back on slowly. Let the tank fill and observe how the valve behaves. If everything is installed correctly, the water should stop at the proper level without continuous running or noise.
Common Mistakes Homeowners Make During Installation
One of the most frequent errors is over-tightening the locknut, which can crack the tank base or damage the seal. Another issue is incorrect float adjustment, leading to either underfilled or overfilled tanks. Some beginners also forget to check for small leaks around the connection points after installation.
In one real case from a suburban home renovation project, a homeowner replaced the valve but skipped testing the overflow tube alignment. The result was continuous water flow for days before they noticed the increased water bill. Small oversights like this highlight why careful step-by-step attention matters.
Real-Life Example: A Simple Fix That Prevented Bigger Damage
A homeowner in a busy household noticed their toilet refilling every 20 minutes. At first, they ignored it, assuming it was normal wear. After a month, their water bill increased significantly. Once inspected, the fill valve was found to be stuck open due to mineral buildup.
By replacing the valve in under an hour, they immediately stopped the water waste. This small repair prevented potential long-term damage to internal toilet components and reduced unnecessary expenses. Situations like this are more common than many people realize, especially in older homes.
Maintenance Habits That Extend Toilet System Lifespan
Regular inspection of your toilet system can help you avoid sudden breakdowns. Checking for slow refilling, unusual sounds, or inconsistent water levels can signal early valve issues. Cleaning the inside of the tank every few months also helps reduce sediment buildup.
Using water softening solutions in areas with hard water can significantly reduce mineral deposits. These small preventive steps can extend the life of your fill valve and reduce the need for frequent replacements.
When Upgrading Becomes the Smarter Choice
Sometimes replacing the fill valve is not just a repair but an opportunity to upgrade. Modern valves are designed to be more efficient, quieter, and more adjustable than older versions. If your toilet has needed multiple repairs in a short time, upgrading the internal components can be more cost-effective in the long run.
Homeowners looking for reliable plumbing solutions often explore trusted sources like BeachCo Roofing Hub for guidance on durable home improvement components and professional recommendations. Choosing the right part can make a noticeable difference in water efficiency and system stability.
Final Practical Advice for Long-Term Success
Learning how to replace a broken toilet fill valve is one of the most useful DIY plumbing skills for homeowners. It saves money, reduces water waste, and prevents unnecessary stress when issues appear unexpectedly. With the right preparation and attention to detail, most people can complete the repair in less than an hour.
If you are planning your next home maintenance upgrade or looking for dependable replacement parts, take the time to choose quality components. A well-installed fill valve ensures your toilet operates smoothly for years without recurring issues.

 David P. Kristman Septic Services and Plumbing Inc.4.0 (9 reviews)
 HEPCO Heating & Plumbing4.0 (7 reviews)
 RF Plumbing & Heating Inc5.0 (5 reviews)
 Liberty Sewer Drain & Plumbing5.0 (2 reviews)
 Wolf Plumbing and Heating3.0 (14 reviews)
 Nichols Plumbing Heating & Cooling Co3.0 (10 reviews)
 How to Find a Reliable Plumber in Your Area
 How to Install a Bathroom Sink: A Beginner's Guide
 What Is the Cost to Replace a Broken Sewer Pipe? Find Out Today
 What Causes Plumbing Leaks and How to Prevent Them
 What to Do if You Have Low Water Pressure: Easy Fixes You Can Do Yourself
 Why Is My Toilet Tank Filling Slowly? Causes and Fixes Explained