
A Practical Guide to Building a Leak-Proof Shower Base That Actually Lasts
- understanding-shower-pan-liner-purpose-and-materials
- preparing-subfloor-and-pre-installation-setup-steps
- step-by-step-installation-of-shower-pan-liner
- common-waterproofing-mistakes-and-how-to-avoid-them
- real-home-project-experience-and-professional-insights
Why a Shower Pan Liner Matters More Than Most Homeowners Realize
When people start a bathroom renovation, they often focus on tiles, fixtures, or shower doors. But experienced builders will tell you the real foundation of a long-lasting shower is hidden underneath: the waterproof membrane. Understanding how to install a shower pan liner correctly is what separates a bathroom that lasts decades from one that develops slow leaks within months.
A shower pan liner is a waterproof barrier installed beneath the mortar bed of a shower floor. Its job is simple but critical: stop water from penetrating into the subfloor and causing structural damage. Without it, even the most beautiful tile work can hide expensive future problems.

coastal & son, llc / aj appliance toms river nj
Toms RiverOcean CountyNew Jersey
1106 Verdant Rd, Toms River, NJ 08753, USA
Understanding Materials Before Starting the Installation
Choosing the Right Type of Liner
Most residential projects use PVC or CPE liners. PVC is more flexible and widely available, while CPE is slightly more durable in extreme conditions. The choice often depends on budget and local building preferences.
What matters more than material type is thickness. A liner that is too thin can tear during installation, especially around corners and drain fittings. Professionals typically recommend a minimum 40-mil thickness for reliability.

Warrior Plumbing & Heating / warrior plumbing
4123 Roland Ave, Baltimore, MD 21211, USA
Supporting Components You Should Not Ignore
Besides the liner itself, you’ll need pre-slope mortar, a clamping drain assembly, and corner dam patches. These small components often determine whether your waterproofing system succeeds or fails long term.
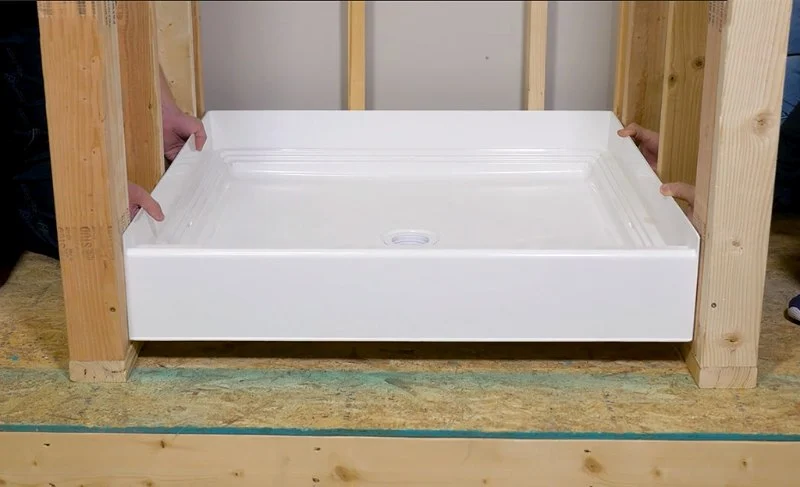
Preparing the Subfloor Before Installing the Liner
Creating a Proper Pre-Slope Base
One of the most misunderstood steps in learning how to install a shower pan liner is the pre-slope. Water should never sit flat under a shower floor. The subfloor must be angled slightly toward the drain so any trapped moisture can escape.
A slope of about 1/4 inch per foot is the industry standard. Without this slope, even a perfectly installed liner can still lead to mold buildup underneath the tile bed.
Cleaning and Framing the Shower Base
Before placing the liner, the subfloor must be clean, dry, and free of nails or debris. Even a small protruding screw can puncture the liner and compromise the entire waterproof system.
At this stage, many DIY installers underestimate the importance of smooth framing edges. Rounded edges reduce stress on the liner and prevent long-term wear.
Step-by-Step Installation Process Explained Clearly
Placing and Securing the Liner
Begin by laying the liner across the shower base, ensuring it extends at least 6–8 inches up each wall. The liner should never be cut at the corners—folding is preferred to maintain waterproof integrity.
Once positioned, secure it only at the top edges of the walls using corrosion-resistant fasteners. Avoid puncturing the lower sections at all costs.
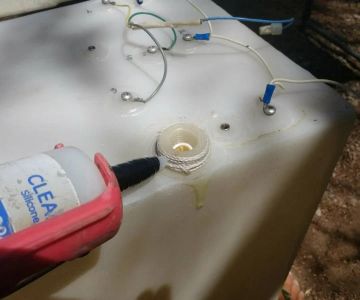
Handling the Drain Connection
The drain is one of the most critical points in the entire system. The liner must be carefully clamped between the upper and lower drain flange.
A common mistake is overtightening bolts, which can deform the liner and create uneven sealing pressure. The goal is a firm but even compression seal.
Corner Folding Techniques
Inside corners should be folded like origami rather than cut. This ensures there are no weak seams where water can escape. Many professionals refer to these folds as “hospital corners” due to their neat, structured appearance.
Real Project Story: A Bathroom That Failed and Was Rebuilt Correctly
A homeowner in Arizona once shared a renovation experience where their newly tiled shower began leaking into the ceiling below within six months. The original contractor had skipped proper liner installation and used a flat base without a pre-slope.
When the shower was torn out, mold was found beneath the tile bed, and the subfloor had begun to soften. The rebuild involved following correct procedures for how to install a shower pan liner, including proper slope, reinforced drain sealing, and careful corner folding.
After reconstruction, the shower has remained completely dry for over five years, proving how essential correct waterproofing is at the foundation level.
Common Installation Mistakes That Lead to Costly Repairs
Incorrect Slope or Flat Base
Without proper slope, water becomes trapped beneath the surface. This leads to mold growth and eventual structural damage.
Puncturing the Liner Below the Water Line
Even a single nail placed too low on the wall can compromise the entire waterproof system. All fastening should remain above the finished shower height.
Ignoring Drain Compatibility
Using the wrong drain assembly or failing to clamp the liner correctly is one of the most common reasons for failure in DIY installations.
Professional Insight: Why Precision Matters More Than Speed
Bathroom waterproofing is not a task where rushing leads to efficiency. In fact, experienced plumbers often spend more time on preparation than installation itself.
The real skill in learning how to install a shower pan liner is patience—checking slopes twice, aligning drains carefully, and ensuring no hidden weak points exist before covering everything with mortar.
For homeowners who want to ensure long-term reliability, exploring professional-grade materials and tools from trusted sources like Reliable Damage Hub can help ensure the system is built to last.
Final Practical Guidance for a Long-Lasting Shower System
A properly installed shower pan liner is invisible once the project is complete, but it is doing the most important job in the entire bathroom. It protects your home from water damage, mold, and structural decay.
When approaching a new installation, focus less on finishing aesthetics and more on the unseen waterproof layers beneath. That mindset alone separates temporary repairs from permanent solutions.

 Perricone Home Services5.0 (120 reviews)
 Power Plumbing4.0 (15 reviews)
 Capital Contracting Plumbing & Heating Corporation4.0 (106 reviews)
 Island Piping Solutions Ltd.5.0 (2 reviews)
 Payne Plumbing & Heating5.0 (5 reviews)
 OMNI PLUMBING5.0 (18 reviews)
 Understanding Sudden Low Faucet Water Pressure and How to Fix It
 Expert Advice on a Leaking Faucet and How to Fix It Safely
 Why Is My Toilet Running After New Flapper Installed?
 How to Fix a Leaking Washing Machine Hose Quickly and Safely
 How to Install a New Sink Shut-Off Valve: A Step-by-Step Guide
 How to Fix a Leaking Bathtub Faucet Stem: A Complete DIY Guide