
Stop the Drip Before It Gets Worse: A Practical Shower Handle Repair Guide
- 1-Why-a-Shower-Faucet-Handle-Starts-Leaking
- 2-Tools-and-Parts-You-May-Need
- 3-What-to-Do-Before-You-Take-Anything-Apart
- 4-Step-by-Step-How-to-Fix-a-Leaky-Shower-Faucet-Handle
- 5-Common-Problems-That-Slow-Down-the-Repair
- 6-When-to-Repair-and-When-to-Replace
- 7-A-Real-Homeowner-Example
- 8-How-to-Prevent-Future-Shower-Handle-Leaks
1. Why a Shower Faucet Handle Starts Leaking
A leaky shower faucet handle usually looks harmless at first. It may start as a slow drip, a tiny bead of water around the trim plate, or a handle that never quite shuts off all the way. Then one day you realize the sound has been bothering you for weeks, your water bill is creeping up, and the stain under the handle is getting worse. That is usually the moment most homeowners finally decide to fix it.
In most cases, the root cause is not mysterious. A worn cartridge, a damaged rubber washer, a cracked O-ring, mineral buildup, or corrosion inside the valve body can all cause a shower handle to leak. The good news is that many of these issues can be fixed without opening the wall or calling a plumber right away.
One thing I have noticed with small plumbing repairs is that people often wait too long because they think it will be complicated. In reality, learning how to fix a leaky shower faucet handle is often more about patience than advanced skill. If you can keep track of parts, turn off water properly, and work slowly, this is one of the more manageable DIY bathroom repairs.
Lawrence Plumbing And Heating / lawrence plumbing
708 E Lake Ave, Baltimore, MD 21212, USA
1.1 The most common leak sources
There are a few usual suspects behind a shower handle leak:
1. The cartridge has worn out and can no longer seal water flow correctly.
2. The stem washer or seat washer has become brittle, flattened, or cracked.
3. The O-ring around the stem has dried out or split.
4. Hard water deposits are preventing the internal parts from closing tightly.
5. The handle itself is loose, which can make the valve feel fully closed when it is not.
JetBlast Inc. Water Blasting Sewer & Drain Cleaning / jet blast drain cleaning
BaltimoreAnne Arundel CountyMaryland
6800 Fort Smallwood Rd, Baltimore, MD 21226, USA
1.2 Why the problem should not be ignored
A constant drip can waste a surprising amount of water over time. Beyond that, moisture around the shower handle can slowly damage trim, encourage mold growth, and leave mineral stains that are much harder to remove later. A small repair now is usually easier and cheaper than dealing with a larger plumbing issue a few months from now.
2. Tools and Parts You May Need
Before you begin, gather everything you are likely to use. Stopping midway to search for a screwdriver or replacement washer is frustrating, especially if you have already disassembled the handle.
2.1 Basic tools
For most repairs, these tools are enough:
1. Flathead screwdriver
2. Phillips screwdriver
3. Allen wrench set
4. Adjustable wrench or channel-lock pliers
5. Utility knife
6. Needle-nose pliers
7. Clean rag or towel
8. Small container for screws and parts
2.2 Parts that may need replacement
The exact part depends on your faucet brand and valve type, but common replacements include:
1. Cartridge
2. O-ring
3. Stem washer
4. Valve seat
5. Handle screw
6. Escutcheon gasket
2.3 A small detail that saves a lot of time
If possible, identify the faucet brand before you shop for parts. Many repairs go much faster when you bring the old cartridge or stem assembly to the hardware store. Matching by sight is often more reliable than guessing based on age or bathroom style.
3. What to Do Before You Take Anything Apart
This is the section people skip when they are in a hurry, and it is usually where trouble begins. A careful start makes the rest of the project much smoother.
3.1 Shut off the water supply
Turn off the water to the bathroom or the entire house before removing the handle. Some showers have local shutoff stops behind the trim, but many do not. If you are unsure, use the main water shutoff. Then open the faucet briefly to confirm the water is no longer flowing.
3.2 Protect the drain
Place a rag or drain cover over the shower drain. Small screws love disappearing into drains, and retrieving them is an unnecessary headache.
3.3 Take reference photos
Use your phone to photograph each stage before removing parts. It sounds simple, but these photos become very helpful during reassembly, especially if multiple rings, clips, or sleeves come off in sequence.
4. Step-by-Step How to Fix a Leaky Shower Faucet Handle
This is where the actual repair begins. The exact design may vary by brand, but the overall process is usually very similar.
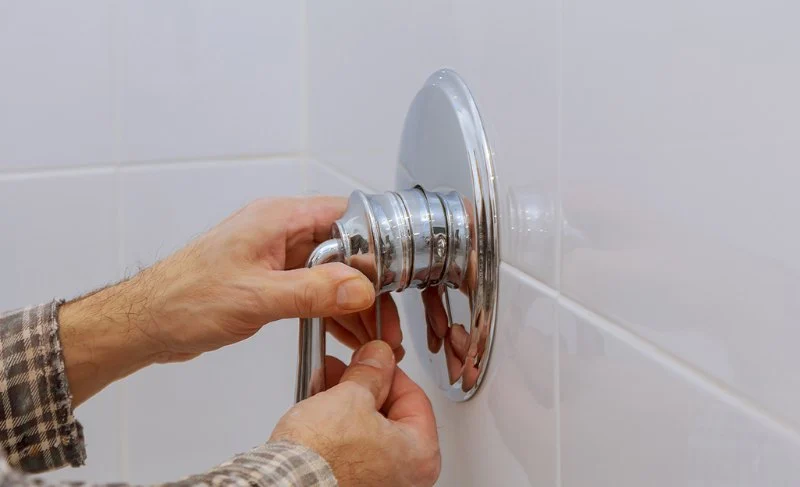
4.1 Remove the handle carefully
Start by locating the screw that holds the handle in place. It may be visible, hidden under a decorative cap, or positioned underneath the handle as a small Allen screw.
1. Pry off any decorative cap gently with a flat screwdriver.
2. Remove the screw using the correct tool.
3. Pull the handle straight off. If it is stuck, wiggle it gently instead of forcing it.
Old handles sometimes seem welded in place because of mineral buildup. If that happens, a little patience matters more than strength. Pulling too hard can crack old plastic parts.
4.2 Remove the trim and access the valve
Once the handle is off, remove the trim plate or escutcheon if necessary. Some are screwed in place, while others slide off after caulk is cut away. If there is old caulk around the plate, score it lightly with a utility knife before pulling.
This exposes the working parts behind the handle. At this stage, you will usually see the stem or cartridge housing.
4.3 Inspect the cartridge, washer, or O-ring
Now look closely at the internal part that controls water flow. In modern faucets, that is usually the cartridge. In older ones, it may be a compression stem with washers and seals.
Check for:
1. Cracks
2. Flattened rubber seals
3. Torn O-rings
4. White or green mineral deposits
5. Rust or visible wear
4.4 Remove the damaged part
If you are dealing with a cartridge, remove the retaining clip or nut first, then slide the cartridge out. If it resists, do not twist wildly. Some cartridges need steady back-and-forth movement to break loose. If you are working on an older stem, unscrew the stem assembly and inspect the washer at the end.
4.5 Clean the valve body before installing new parts
This step is easy to overlook, but it matters. Even a new cartridge may not seal properly if the valve body is packed with scale or grit. Wipe the area clean with a rag and remove any visible debris.
If mineral deposits are heavy, a little white vinegar on a cloth can help soften buildup. Just do not flood the wall cavity or leave residue behind.
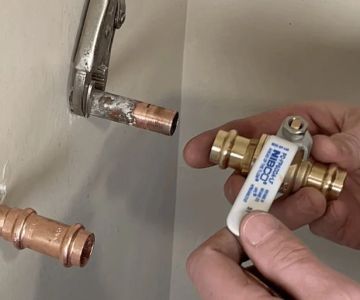
4.6 Install the replacement part
Insert the new cartridge, washer, or O-ring in the same orientation as the old one. This is where those reference photos pay off.
1. Align tabs or notches exactly if using a cartridge.
2. Tighten retaining nuts firmly but not excessively.
3. Replace washers and O-rings with matching sizes only.
4. Apply plumber’s grease lightly on rubber parts if recommended by the manufacturer.
4.7 Reassemble the handle and test the repair
Reattach the trim and handle in reverse order. Turn the water supply back on slowly. Then test the shower handle by opening and closing it several times. Watch closely for dripping from the spout, moisture behind the handle, or any stiffness while turning.
If the drip is gone, you likely solved the issue. If water still leaks, the problem may involve the valve seat, deeper valve wear, or an incorrect replacement part.
5. Common Problems That Slow Down the Repair
Even a straightforward shower faucet repair can hit a few annoying roadblocks. These are the ones homeowners run into most often.
5.1 The handle will not come off
This is extremely common in older bathrooms. Soap residue, rust, and mineral scale can lock the handle in place. Slow, even pressure works better than force. If needed, use a handle puller designed for faucet repairs rather than risking damage with improvised tools.
5.2 The replacement part looks almost right
Almost right is usually not good enough in plumbing. A cartridge that is slightly different in length or groove position may fit into the valve body but still leak. Matching by exact model or bringing the original part to the store is the safest route.
5.3 The leak is still there after replacement
If the drip continues after replacing the cartridge or washer, the issue may be deeper inside the valve body. A scored valve seat, internal corrosion, or damage from years of hard water may prevent a full seal. At that point, the repair may go beyond a simple handle fix.
6. When to Repair and When to Replace
Not every shower faucet should be endlessly repaired. Sometimes the smarter move is replacing worn internal parts; other times, the entire faucet assembly is simply too far gone.
6.1 Repair usually makes sense when
1. The faucet is otherwise in good shape.
2. The leak is clearly linked to a cartridge, washer, or O-ring.
3. Replacement parts are easy to find.
4. The valve body is not corroded or cracked.
6.2 Replacement may be better when
1. The faucet is very old and parts are discontinued.
2. Multiple leaks have appeared in a short time.
3. The valve body is damaged.
4. You want better water control, updated style, or improved efficiency.
There is a point where repeated small fixes become more expensive than installing a more reliable new system. That is especially true if your bathroom has older plumbing with several signs of wear.
7. A Real Homeowner Example
A friend of mine moved into an older home and noticed a steady drip from the shower that seemed minor at first. He assumed the handle just needed to be tightened, so he ignored it for months. Eventually the drip got louder, and the trim plate started collecting white mineral marks.
When he finally opened it up, the cartridge was heavily coated with hard water scale, and the O-ring had flattened to the point that it barely resembled rubber anymore. The repair itself took less than an hour once he had the correct part. What surprised him most was not the difficulty of the job, but how avoidable the whole drawn-out problem had been.
That story sticks with me because it is so typical. Small home repairs tend to feel larger in our minds than they really are. Once you understand the process, fixing a leaky shower faucet handle becomes much less intimidating.
8. How to Prevent Future Shower Handle Leaks
Once the leak is fixed, a little maintenance can help keep it from returning too soon.
8.1 Reduce wear from hard water
If your home has hard water, mineral buildup is probably shortening the life of washers and cartridges. Cleaning fixtures regularly and considering water treatment solutions can make a real difference over time.
8.2 Avoid overtightening the handle
Many people instinctively crank the handle tighter when a drip begins. That can actually wear out internal seals faster. A shower handle should close firmly, not forcefully.
8.3 Replace worn parts early
If you notice stiffness, minor seepage, or inconsistent water shutoff, deal with it early. Replacing a seal or cartridge at the first sign of trouble is usually much easier than waiting until the handle becomes stuck or the valve wears down further.
If you have been putting off this repair, now is a good time to act. The right cartridge, washer kit, plumber’s grease, or faucet repair tools can make fixing a leaky shower faucet handle far easier than most homeowners expect. Learn more, compare the latest repair products, and check the best options available before your next drip turns into a bigger bathroom problem.


 Your local plumber5.0 (6 reviews)
 Transou's Plumbing & Septic | Emergency Plumber Winston-Salem, NC | Tankless Water Heater Repair | Septic Tank | Sewer Repair4.0 (641 reviews)
 Reglazing bath5.0 (22 reviews)
 Best Choice Plumbing & Heating4.0 (1620 reviews)
 Charles H. Francis & Sons, Plumbing and Heating4.0 (31 reviews)
 Ace Mechanical4.0 (63 reviews)
 Best Ways to Understand Plumbing Codes
 Beginner's Guide to Unclogging a Bathtub Drain
 How Much Does It Cost to Reduce Your Water Bill in 2025?
 How to Fix a Slow Draining Sink: Quick Solutions for Homeowners
 Ultimate Guide to Fixing a Garbage Disposal: Troubleshoot & Repair
 When Should You Call a Plumber for Preventing Winter Plumbing Issues | PlumberNear