
How to Fix a Leaking Sink Tailpiece
- Introduction
- Understanding the Sink Tailpiece
- Common Causes of Leaks in Sink Tailpieces
- Tools You’ll Need to Fix the Leak
- Step-by-Step Guide to Fixing a Leaking Sink Tailpiece
- Pro Tips for Long-Term Leak Prevention
- Real-World Example: Fixing a Leaking Tailpiece
Introduction
If you're dealing with a leaking sink tailpiece, you're not alone. A leaky tailpiece is a common plumbing issue that can cause water damage if not addressed quickly. Thankfully, fixing it is often a straightforward process that you can handle with some basic tools and a bit of know-how. In this article, we’ll walk you through the steps to fix a leaking sink tailpiece, covering everything from identifying the problem to providing tips for future prevention. Whether you’re a DIY enthusiast or a first-time plumber, this guide will help you resolve the issue effectively.

Landry Mechanical Inc Plumbing HVAC & Electric / landry mechanical
FraminghamMiddlesex CountyMassachusetts
763 Waverly St unit 32, Framingham, MA 01702, USA
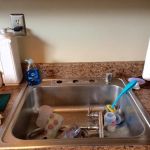
Understanding the Sink Tailpiece
The tailpiece is a crucial component of your sink’s plumbing system. Located between the sink drain and the trap, the tailpiece connects the drain to the rest of the plumbing system. Over time, the materials used in the tailpiece—whether metal or plastic—can wear out or loosen, leading to leaks. Understanding where the tailpiece is and how it functions can help you diagnose the issue and know where to focus your repairs.

Warrior Plumbing & Heating / warrior plumbing
4123 Roland Ave, Baltimore, MD 21211, USA
Common Causes of Leaks in Sink Tailpieces
There are several reasons why a sink tailpiece might start leaking. Here are some of the most common culprits:
1. Loose Connections
One of the most common causes of leaks in a sink tailpiece is a loose connection between the tailpiece and the drain or trap. Over time, vibrations from water flow or general wear can loosen these connections, leading to leaks.
2. Worn-Out Washers or Gaskets
Washers or rubber gaskets in the tailpiece assembly can wear out over time. These parts provide a seal that prevents water from leaking at the joints. When they degrade, they can allow water to seep through.
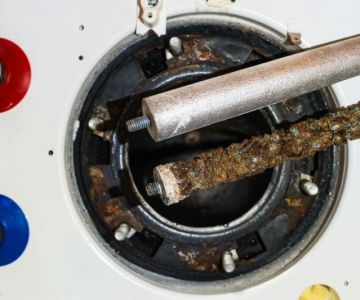
3. Corrosion or Cracks in the Tailpiece
For metal tailpieces, corrosion can occur over time, especially in areas with hard water. Corrosion can cause the metal to weaken and crack, leading to leaks. Plastic tailpieces, while less prone to corrosion, can crack due to aging or impacts.
Tools You’ll Need to Fix the Leak
Before you start fixing the leak, make sure you have the right tools for the job. Here’s what you’ll need:
1. Adjustable Wrench
An adjustable wrench is essential for loosening and tightening plumbing connections, particularly around the tailpiece and trap.
2. Plumber’s Tape (Teflon Tape)
If you need to reseal the connections, plumber’s tape will help create a tight seal between threads and prevent future leaks.
3. Pipe Wrench
A pipe wrench might be necessary if the tailpiece or trap is very tight and difficult to unscrew by hand.
4. Replacement Washers or Gaskets
If you find that the washers or gaskets are worn out, have replacements on hand. These parts are inexpensive and easy to find at any hardware store.
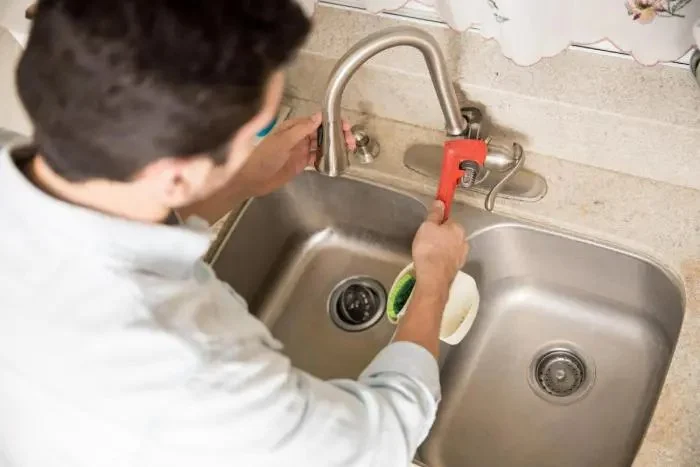
Step-by-Step Guide to Fixing a Leaking Sink Tailpiece
Follow these simple steps to fix your leaking sink tailpiece:
1. Turn Off the Water Supply
Before you begin any plumbing repair, always turn off the water supply to avoid further leaks and potential flooding. Locate the shut-off valve under the sink and turn it clockwise to stop the water flow.
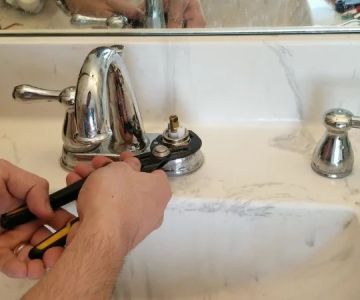
2. Remove the Old Tailpiece
Use an adjustable wrench to loosen the nuts that hold the tailpiece to the drain and the trap. Carefully remove the tailpiece from its connections. Be prepared for some residual water to spill out when you remove the part.
3. Inspect for Damage
Examine the tailpiece, washers, and gaskets for any signs of wear, cracks, or corrosion. If the tailpiece is cracked or corroded, it will need to be replaced. Similarly, if the washers are damaged, they should be replaced with new ones.
4. Install the New Tailpiece
Place a new washer or gasket onto the end of the new tailpiece and carefully align it with the drain and trap. Tighten the nuts with an adjustable wrench, making sure they are secure but not over-tightened, as this can cause damage to the plumbing parts.
5. Test for Leaks
Once the new tailpiece is installed, turn the water supply back on and check for any signs of leakage. If there are no leaks, your repair is complete. If you notice a small leak, tighten the connections a bit more and check again.
Pro Tips for Long-Term Leak Prevention
Here are a few tips to prevent future leaks in your sink’s tailpiece:
1. Regular Inspections
Regularly inspect your plumbing connections to ensure everything is secure. Tightening loose connections as soon as you notice them can prevent leaks before they become major problems.
2. Avoid Over-Tightening
When reinstalling the tailpiece, be sure not to over-tighten the connections. Over-tightening can cause cracks in the parts, leading to future leaks.
3. Use Quality Parts
Always use high-quality washers, gaskets, and tailpieces to ensure a secure and long-lasting connection. Cheaper parts may wear out more quickly, causing leaks sooner.
Real-World Example: Fixing a Leaking Tailpiece
Take the case of John, who was facing a persistent leak under his kitchen sink. The drip had become a constant source of frustration, especially after he noticed water damage on the cabinet floor. After following the steps outlined above, John discovered that the tailpiece had corroded over time. With some basic tools and a quick trip to the hardware store, John replaced the tailpiece and fixed the leak within an hour. He shared, “It felt so satisfying to fix the issue myself, and I’m glad I didn’t have to call a plumber!”
Conclusion
Fixing a leaking sink tailpiece doesn’t have to be a daunting task. With the right tools and a little know-how, most homeowners can tackle this plumbing issue on their own. Regular maintenance and timely repairs will help you avoid more significant problems in the future. For the best plumbing products and expert advice, be sure to check out LifeStar Car Rental for the most suitable items and recommendations tailored to your needs.


 Grothouse Plumbing5.0 (3 reviews)
 Doctor Rooter Plumbing5.0 (1 reviews)
 Carlton E Magee5.0 (1 reviews)
 Bluewater Plumbing, Heating and Air Conditioning4.0 (47 reviews)
 Warner Super Service4.0 (564 reviews)
 Gaithersburg Plumbing Pros4.0 (82 reviews)
 Why Choosing the Right Pipe Materials Matters for Your Home
 Plumber's Tips for Frozen Pipes – Prevention, Thawing, and Expert Help
 Beginner’s Guide to Preventing Winter Plumbing Issues in the U.S.
 Expert Advice on Sewer Line Backups: Prevention and Solutions
 Best Ways to Understand Plumbing Codes
 Avoid These Mistakes When Maintaining Your Plumbing System