
Stop the Drip: A Practical Guide to Repairing a Bathroom Faucet Spout
- why-a-bathroom-faucet-spout-starts-leaking
- what-to-check-before-you-start-the-repair
- how-to-fix-a-leaking-bathroom-faucet-spout-step-by-step
- mistakes-that-often-make-the-leak-worse
- when-a-simple-repair-is-not-enough
- choosing-the-right-parts-for-a-lasting-fix
1. Why a Bathroom Faucet Spout Starts Leaking
A dripping faucet spout looks minor at first, but anyone who has listened to that steady tap-tap-tap at two in the morning knows how quickly it becomes a real problem. In many homes, the issue starts small. A few drops after turning off the handle do not seem urgent. Then a week passes, the drip becomes constant, and suddenly the sink area always feels damp. That is usually the moment people start searching for how to fix a leaking bathroom faucet spout.
In most cases, the leak comes from worn internal parts rather than the spout itself being cracked. Washers flatten, cartridges wear out, O-rings become brittle, and valve seals stop creating a watertight fit. The spout is only the visible end of a deeper mechanical issue. That is why wiping the faucet dry or tightening the visible hardware rarely solves the problem for long.
Go Green Plumbing, Heating, Air & Electrical / go green plumbing heating and air
GreensboroGuilford CountyNorth Carolina
300 Pomona Dr, Greensboro, NC 27407, USA
1.1 The Most Common Mechanical Causes
There are a few repeat offenders behind a bathroom faucet spout drip.
1. A worn cartridge in a modern single-handle faucet can allow water to pass through even when the handle is off.
2. Damaged rubber washers in older compression faucets often lose their ability to seal properly.
3. Hardened O-rings may lead to leaks around the base or contribute to unstable sealing pressure inside the faucet body.
4. Mineral buildup from hard water can interfere with how the internal components sit and move.
Lawrence Plumbing And Heating / lawrence plumbing
708 E Lake Ave, Baltimore, MD 21212, USA
1.2 A Real-Life Example That Feels Familiar
One homeowner in Ohio described noticing a slow drip that only happened during the night. At first, it seemed random. After a closer look, the faucet leaked most when the hot water handle had been used. The culprit turned out to be a worn hot-side valve seat and washer combination. The repair cost very little, but waiting too long had already left light staining in the sink and wasted more water than expected. That is a common pattern. The repair is often simpler than the annoyance it causes.
2. What to Check Before You Start the Repair
Before taking the faucet apart, it helps to slow down and identify exactly what type of faucet you are dealing with. This saves time, prevents buying the wrong parts, and makes the repair far less frustrating. People often jump straight into disassembly, only to discover halfway through that they do not know whether the faucet uses a cartridge, ceramic disc, ball, or compression system.
2.1 Identify the Faucet Style First
The way the handle works usually gives the first clue.
1. A single-handle faucet often uses a cartridge, ball, or ceramic disc setup.
2. A two-handle faucet in an older home often uses compression stems with washers.
3. Some mid-range bathroom faucets use quarter-turn ceramic cartridges that look simple outside but require exact replacement parts.
This matters because the answer to how to fix a leaking bathroom faucet spout depends heavily on the faucet’s internal design.
2.2 Gather the Right Tools Before Opening Anything
A calm repair starts with basic preparation. Most faucet repairs need an adjustable wrench, screwdriver set, Allen key, plumber’s grease, needle-nose pliers, a clean cloth, and the correct replacement part. A small tray is also surprisingly helpful because faucet screws and retaining clips are easy to lose.
2.3 Shut Off Water and Protect the Sink Area
Turn off both supply valves under the sink. Then open the faucet to release leftover pressure. Place a rag in the drain so tiny screws or clips do not disappear into the plumbing. This step sounds basic, but experienced DIYers know it prevents the kind of mistake that turns a thirty-minute repair into a trip to the hardware store.
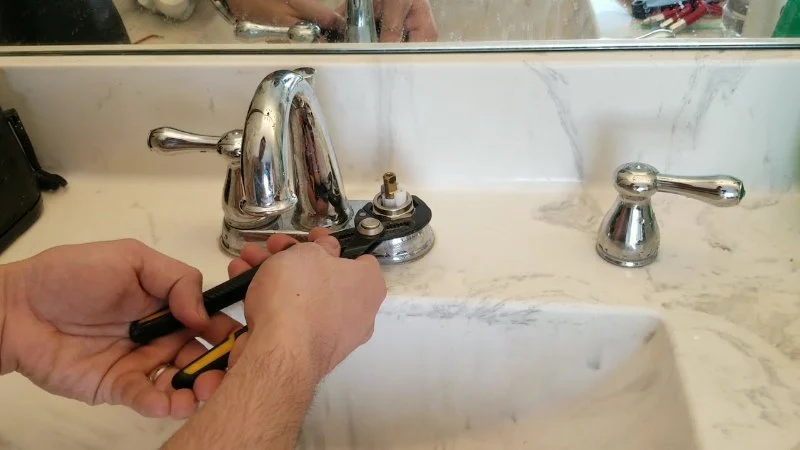
3. How to Fix a Leaking Bathroom Faucet Spout Step by Step
This is the part most readers actually need, and thankfully, it is often manageable even for someone with limited repair experience. The key is to move slowly, remember the order of the parts, and avoid forcing anything.
3.1 Remove the Handle Carefully
Start by locating the decorative cap or small set screw on the handle. Once removed, lift the handle away gently. Sometimes mineral buildup makes the handle stubborn, so light wiggling helps. Avoid prying aggressively because that can crack the trim or scratch the finish.
3.2 Access the Internal Valve or Cartridge
Once the handle is off, remove the retaining nut or clip that holds the internal part in place. At this stage, the repair path splits depending on faucet type.
1. If it is a cartridge faucet, pull the cartridge straight out and inspect it for wear, cracking, or scale buildup.
2. If it is a compression faucet, remove the stem and inspect the washer and valve seat.
3. If it is a ceramic disc faucet, check the cartridge assembly and seals for debris or damage.
3.3 Replace the Worn Part Instead of Guessing
This is where many successful repairs are won. Do not assume a part is fine just because it looks mostly intact. A slightly flattened washer or a cartridge with minor wear can still cause a steady leak. Matching the old part to a new one is usually the most reliable move. If the original cartridge has a model number, use it. If not, bring the part to a plumbing supply store for comparison.
3.4 Clean Internal Surfaces Before Reassembly
Before installing the new part, wipe out sediment and mineral deposits from inside the faucet body. A soft cloth and vinegar can help with scale, though harsh scraping should be avoided. This step matters more than people think. Even a good replacement part can fail to seal if it is sitting against debris.
3.5 Reassemble and Test the Faucet
Install the new washer, cartridge, or seal in the same position as the original. Apply plumber’s grease where appropriate, but use it lightly. Reattach the retaining nut, reinstall the handle, and slowly turn the water back on. Then test both hot and cold sides. If the dripping has stopped, you have solved the issue correctly. If the faucet still leaks, the problem may involve the valve seat, faucet body wear, or an incorrect replacement part.
3.6 Why This Repair Often Works Better Than People Expect
There is something satisfying about fixing a faucet because the result is immediate. The drip stops, the sink area feels cleaner, and the bathroom suddenly sounds normal again. It is one of those home repairs where a modest amount of effort can make the entire room feel better maintained.
4. Mistakes That Often Make the Leak Worse
Even a simple bathroom faucet repair can go wrong when people rush. Most of the frustrating stories around faucet repair do not come from complex plumbing failures. They come from small, avoidable mistakes.
4.1 Using the Wrong Replacement Part
This is probably the most common issue. A cartridge that almost fits is not good enough. The same goes for washers that seem close in size. A tiny mismatch can leave the faucet dripping just as badly as before.
4.2 Overtightening During Reassembly
Many people assume tighter means better. In faucet repair, that is often false. Overtightening can damage seals, strip threads, or crack plastic internal parts. Firm is usually enough.
4.3 Ignoring Hard Water Buildup
In many parts of the United States and Europe, hard water quietly destroys faucet performance over time. If scale buildup is left inside the faucet body, even a new cartridge may not seal cleanly. That leads to the frustrating feeling that the repair “didn’t work,” when the real issue was leftover debris.
4.4 Replacing One Part When Two Are Worn
A faucet with age may have both a worn cartridge and tired O-rings. Replacing only the obvious part can reduce the leak but not fully solve it. Skilled plumbers often inspect the full sealing system rather than focusing on a single component.
5. When a Simple Repair Is Not Enough
Sometimes the answer to how to fix a leaking bathroom faucet spout is not another repair attempt. If the faucet body is corroded, if replacement parts are discontinued, or if repeated leaks return within a short time, replacement may make more sense than continued patchwork.
5.1 Signs the Faucet May Need Replacement
There are several clear warning signs.
1. The faucet keeps leaking after correct cartridge or washer replacement.
2. Corrosion is visible inside the faucet body.
3. The handle action feels rough or loose even after repair.
4. Parts are hard to identify or no longer sold by common suppliers.
5.2 A Cost Comparison Worth Thinking About
Homeowners sometimes spend weeks chasing a drip with repeated small fixes. A new cartridge, then new seals, then another handle kit. At some point, the time and hassle outweigh the savings. A quality new faucet can improve water efficiency, modernize the room, and eliminate uncertainty. That does not mean every drip requires replacement, but it is worth being honest about the condition of the fixture.
6. Choosing the Right Parts for a Lasting Fix
If you want the repair to last, the part selection matters almost as much as the repair itself. Cheap off-brand cartridges sometimes fit poorly. Low-grade washers wear faster. Poorly made seals can start leaking again surprisingly quickly. This is especially true in homes with high water pressure or mineral-heavy water.
6.1 What Experienced DIYers Usually Look For
Reliable replacement parts tend to share a few qualities.
1. Exact compatibility with the faucet model.
2. Durable rubber or ceramic sealing components.
3. Good reviews from real homeowners and trade users.
4. Clear installation guidance from the manufacturer.
6.2 Why Better Parts Usually Mean Fewer Repeat Repairs
A bathroom faucet is one of those fixtures you use every single day without thinking about it. Because of that, even a small internal weakness gets exposed fast. Spending a little more for dependable parts usually saves money and annoyance later. That is not marketing hype. It is simply how wear-and-tear works in a busy home.
6.3 The Next Step if You Are Ready to Fix the Leak Properly
If you have been putting off this repair, now is the right time to handle it before the dripping becomes a larger problem. When you know how to fix a leaking bathroom faucet spout, the job feels far less intimidating, and choosing the right cartridge, washer, or repair kit becomes the real difference between a temporary patch and a dependable fix.
Explore the latest repair parts, compare reliable faucet components, and take a closer look at the best solutions for how to fix a leaking bathroom faucet spout before your small drip turns into a bigger expense.

 The Plumbing & Air Service Co.4.0 (521 reviews)
 Proline Home Renovations Inc. 24/7 Emergency Plumber and Drain Cleaning5.0 (16 reviews)
 G Ritsick & Sons Inc. Mechanical Contractors4.0 (8 reviews)
 GRACE MILLENIUM CONTRACTING LLC.5.0 (1 reviews)
 L & D Sons Plumbing & Heating, LLC5.0 (10 reviews)
 Nunzio's Son Plumbing4.0 (2 reviews)
 Should I Replace or Repair Frozen Pipes? Tips for Homeowners
 When Should You Call a Plumber? Tips for Finding a Reliable Plumber Near You
 Plumber's Tips for a Running Toilet
 How to Fix Diagnosing Plumbing Noises - PlumberNear
 Is It Safe to Detect a Hidden Water Leak? Expert Guide on Leak Detection
 How to Prevent Hard Water Damage in Your Plumbing