
- 1 - Why Should You Replace Your Toilet Flush Handle?
- 2 - How to Know If Your Toilet Flush Handle Is Broken
- 3 - Tools You'll Need for Replacing the Toilet Flush Handle
- 4 - Step-by-Step Guide to Replacing the Toilet Flush Handle
- 5 - Common Mistakes to Avoid When Replacing a Toilet Handle
- 6 - When to Consider Professional Help
1 - Why Should You Replace Your Toilet Flush Handle?
The toilet flush handle plays a crucial role in your bathroom’s daily operation. When it breaks, you may struggle with flushing, causing frustration and inconvenience. Replacing the handle can restore your toilet's functionality quickly and prevent more significant plumbing issues down the line. Here’s why it’s essential to fix it as soon as possible:
1.1 Prevent Water Waste
A malfunctioning toilet flush handle can lead to inefficient flushing, causing the toilet to run continuously and waste water. By replacing the broken handle, you’ll prevent unnecessary water consumption and help conserve resources.
1.2 Restore Toilet Functionality
A working flush handle ensures your toilet performs properly. Replacing it quickly means no more awkward or difficult attempts to flush—just a smooth, efficient operation every time you need it.
2 - How to Know If Your Toilet Flush Handle Is Broken
It can be hard to know when your toilet handle is broken. Below are some signs to look for that indicate it’s time for a replacement:
2.1 The Handle Is Loose or Stuck
If your toilet flush handle feels loose, won’t return to its original position, or gets stuck, it’s likely broken. This can prevent the toilet from flushing properly or cause unnecessary strain on the flush mechanism.
2.2 The Toilet Takes Multiple Attempts to Flush
When the flush handle is damaged, it may take several tries to get the toilet to flush. This can be annoying and time-consuming, and it’s a clear sign that the handle needs replacing.
3 - Tools You'll Need for Replacing the Toilet Flush Handle
Replacing a toilet flush handle is a relatively simple task, but you'll need the right tools to do the job efficiently. Here's what you'll need:
3.1 Adjustable Wrench
An adjustable wrench will help you loosen and tighten the nuts around the toilet flush handle mechanism.
3.2 Replacement Flush Handle
Make sure to purchase a replacement handle that is compatible with your toilet model. Many stores sell universal flush handles that work with most toilets.
3.3 Flathead Screwdriver
You may need a flathead screwdriver to remove any screws or small parts during the replacement process.
4 - Step-by-Step Guide to Replacing the Toilet Flush Handle
Now that you know the tools you'll need, here's a detailed step-by-step guide to replacing your broken toilet flush handle:
4.1 Turn Off the Water Supply
Before starting any repair, turn off the water supply to the toilet. This will prevent water from flowing into the tank while you’re working on the handle.
4.2 Remove the Tank Lid
Carefully remove the tank lid and place it in a safe spot. You’ll be working inside the tank, so it’s essential to have easy access.
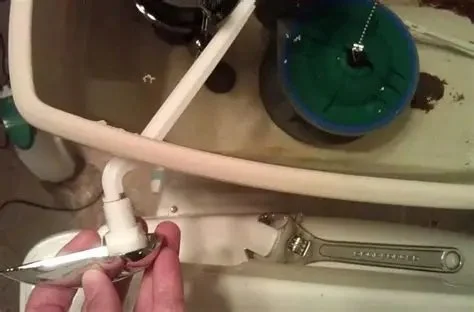
4.3 Loosen the Nuts
Using your adjustable wrench, loosen the nuts that are securing the flush handle to the tank. Be careful not to overtighten or damage the parts.
4.4 Detach the Old Handle
Once the nuts are loosened, remove the old flush handle from the tank. Take note of how the handle is connected to the flush lever mechanism, as you’ll need to replicate this during the installation of the new handle.
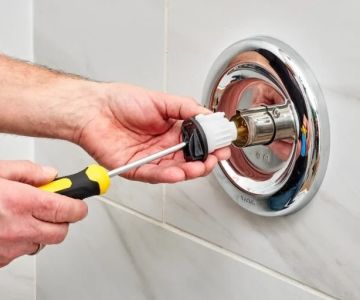
4.5 Install the New Handle
Position the new flush handle in place, ensuring it aligns properly with the mechanism. Tighten the nuts securely but be careful not to overtighten, as this can crack the porcelain tank.
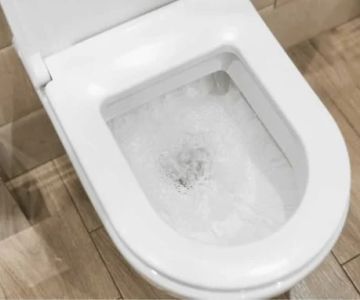
4.6 Test the New Handle
Turn the water supply back on and test the new handle by flushing the toilet. Make sure the handle operates smoothly and the toilet flushes effectively.
5 - Common Mistakes to Avoid When Replacing a Toilet Handle
While replacing a broken toilet flush handle is relatively easy, there are some common mistakes to avoid:
5.1 Not Turning Off the Water Supply
Always remember to turn off the water supply before starting any repair. Forgetting this step can lead to leaks and water damage.
5.2 Using the Wrong Size Handle
Ensure that you purchase the correct size and type of flush handle. Using the wrong one can cause the toilet to malfunction and may lead to further repairs.
5.3 Over-tightening the Nuts
Over-tightening the nuts around the flush handle can crack the toilet tank. Tighten the nuts just enough to hold the handle securely, but don’t force them too much.
6 - When to Consider Professional Help
In some cases, you may encounter issues beyond just the flush handle that require professional assistance:
6.1 Persistent Water Leaks
If you notice water leaking from the tank or around the base of the handle, it might be a sign of a larger issue, like a cracked tank or damaged seal. In such cases, it’s best to call a plumber.
6.2 Difficulty with Handle Installation
If you’re having trouble installing the new flush handle or aren’t sure which parts to connect, consider hiring a professional. A plumber can quickly fix the issue and ensure everything is working correctly.
Replacing a broken toilet flush handle is a simple task that can save you time and money on repairs. With the right tools and a little know-how, you’ll have your toilet flushing like new in no time. If you’re looking for the best replacement parts or professional help, visit our website, Reliable Toilet Fix, for more options.

 AAA Plumbing & Heating Services3.0 (4 reviews)
 Big Red Services - Plumbing, Heating, Cooling, and HVAC Services5.0 (153 reviews)
 Uppercut Plumbing4.0 (121 reviews)
 L & F Plumbing3.0 (2 reviews)
 A. Stevens Plumbing & Heating Inc.4.0 (39 reviews)
 Exceptional Service Today5.0 (10 reviews)
 What to Know Before Hiring a Plumber: Key Questions to Ask
 How to Deal with Common Plumbing Problems in Your Kitchen
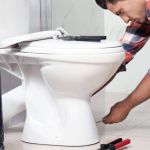 What Causes Installing a New Toilet: Essential Tips and Considerations
 What Is the Cost to Replace Old Plumbing Pipes?
 Why Is My Toilet Randomly Running at Night? Common Causes and Fixes
 Ultimate Guide to Low Water Pressure: Causes, Solutions, and Expert Tips