
Building a Leak-Free Shower Base That Lasts
- why-the-liner-matters-more-than-most-people-think
- what-you-need-before-you-start-the-job
- getting-the-shower-base-ready-the-right-way
- how-to-install-a-shower-pan-liner-step-by-step
- the-corners-curb-and-drain-where-most-mistakes-happen
- a-real-world-lesson-from-a-failed-diy-shower
- testing-your-work-before-the-final-mud-bed
- how-to-make-the-finished-shower-last-longer
1. Why the Liner Matters More Than Most People Think
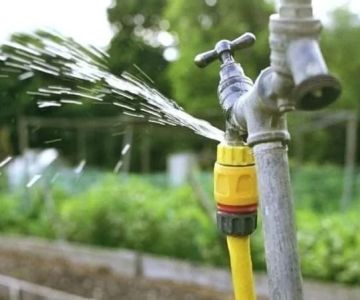
If you have ever torn out an old shower and found blackened subfloor, soft framing, or that unmistakable musty smell, you already know the truth: tile is not the waterproof layer. It may look solid from the surface, but water has a way of sneaking through grout lines, around corners, and down into the base over time. That is exactly why learning how to install a shower pan liner matters so much. The liner is what quietly protects the structure beneath the shower, year after year, long after the tile work gets all the attention.
A lot of first-time DIYers assume the liner is just another layer in the build. In reality, it is one of the most important parts of the entire shower system. Get it right, and the rest of the project has a strong foundation. Get it wrong, and you can end up with hidden damage that takes months or even years to show up. By then, the repair is never small.

coastal & son, llc / aj appliance toms river nj
Toms RiverOcean CountyNew Jersey
1106 Verdant Rd, Toms River, NJ 08753, USA
1.1 What the shower pan liner actually does
The liner sits beneath the final mortar bed and directs any water that reaches the base toward the drain’s weep holes. In other words, it is the backup waterproofing system that protects the wood framing and subfloor from moisture damage. It is not decorative. It is not optional in a traditional shower pan build. It is essential.
Go Green Plumbing, Heating, Air & Electrical / go green plumbing heating and air
GreensboroGuilford CountyNorth Carolina
300 Pomona Dr, Greensboro, NC 27407, USA
1.2 Why so many shower failures begin here
Most failed shower pans do not fail because the tile looked bad. They fail because the waterproofing underneath was cut, nailed too low, sloped incorrectly, or never tested. This is why pros talk about the drain connection, curb wrapping, and corner treatment with almost obsessive care. They know these are the details that determine whether the shower survives real daily use.
2. What You Need Before You Start the Job
Before getting into how to install a shower pan liner, it helps to gather everything in advance. This is not a project where you want to stop halfway through because you forgot dam corners or the right adhesive. The smoother the prep, the better the result.
2.1 Core materials
You will typically need a PVC or CPE shower pan liner, a compatible clamping drain assembly, pre-formed dam corners, roofing nails or staples for approved areas, liner adhesive if your material requires it, and deck mud for the pre-slope and final mortar bed. Depending on the build, you may also need metal lath for the curb and cement backer board for the walls.
2.2 Basic tools that make the work easier
A tape measure, utility knife, straightedge, level, trowel, marker, hammer or staple gun, and a drain plug for flood testing are standard. A notched trowel is not the star of this job, but a clean, sharp knife definitely is. A sloppy cut on the liner can turn into a headache fast.
2.3 Why material compatibility matters
One of the more frustrating mistakes in bathroom waterproofing is mixing products that are not meant to work together. Some adhesives, some drain components, and some liners are designed as systems. It is always worth checking compatibility instead of assuming one brand’s part will behave perfectly with another.
3. Getting the Shower Base Ready the Right Way
No matter how carefully you handle the liner itself, the shower base underneath has to be built correctly first. This is where many DIY shower pan liner projects go off track. People want to get straight to the membrane, but the liner cannot do its job unless the substrate and slope beneath it are correct.
3.1 Start with a proper subfloor inspection
The subfloor needs to be sound, clean, and solid. If there is water damage, movement, or rot, fix that before anything else. A shower is not the place to hope weak wood will hold up. It usually does not.
3.2 The pre-slope is not optional
This is one of the biggest lessons in how to install a shower pan liner properly. The liner should never lie flat on a flat floor. It needs to sit over a pre-slope that directs water toward the drain. Without that slope, water can pool beneath the mortar bed, leading to odor, slow drying, and long-term moisture issues.
3.2.1 A simple rule that saves a lot of trouble
The common rule is about one-quarter inch of slope per foot toward the drain. That may not sound like much, but it is enough to keep water moving where it should go.
3.3 Blocking around the perimeter helps support the liner
Between the studs, install blocking around the lower perimeter of the shower walls. This gives the liner backing and helps prevent it from bowing inward. It also makes the finished build feel more solid when the wall board goes up later.
3.4 Notching studs prevents ugly wall flare
Because the liner folds at the corners and rises up the walls, it creates thickness. Many experienced installers notch the studs or fur out the upper wall area so the backer board can hang straight without bulging at the bottom. This is a small detail, but it makes a noticeable difference in the final look.
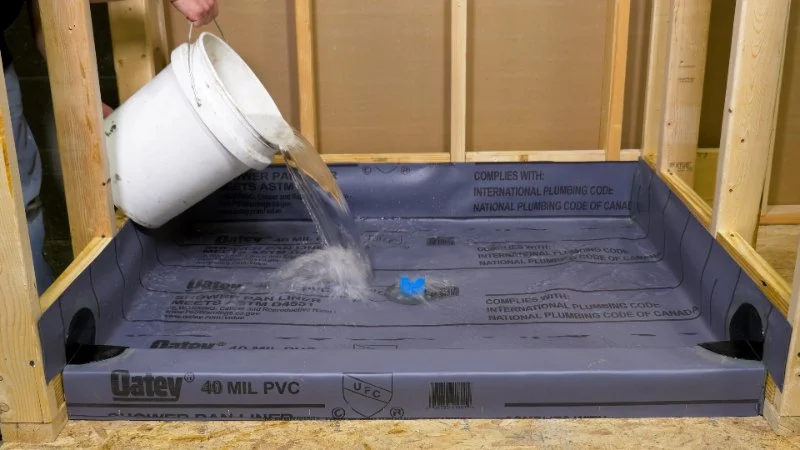
4. How to Install a Shower Pan Liner Step by Step
Now to the part most people came for: how to install a shower pan liner in a way that is actually durable. The goal is not just to get the liner in place. The goal is to install it so it stays waterproof under years of use.
4.1 Measure generously before cutting
Measure the shower floor, then include enough material for the liner to run up the walls and over the curb. In most traditional installations, the liner should rise at least 3 inches above the finished curb height on all sides. It is far better to cut slightly large and trim carefully than to discover you are short after positioning it.
4.2 Lay the liner into the pan without stretching it tight
Place the liner over the pre-slope and gently press it into the floor and corners. Do not pull it drum-tight. The material needs to sit naturally in the pan so it does not fight the corners or lift away from the slope. Think smooth and relaxed, not stretched.
4.3 Run the liner up the walls
Bring the liner up each wall high enough to meet code and good practice. In a typical shower, that means well above the curb. Fasteners should be placed only near the top edge, never low in the pan area where water may collect.
4.3.1 The rule about fasteners that people remember after it is too late
Never nail or staple the liner on the inside face of the curb or lower than a safe height on the walls. One careless fastener in the wrong place can defeat the whole waterproofing system.
4.4 Cut only the drain opening, and do it carefully
Once the liner is settled, locate the drain opening. Cut a small X or circular opening only where the drain throat sits, then bolt the clamping ring down according to the drain design. The liner should be trapped tightly between the drain flange and the clamping ring to form a watertight seal.
4.5 Protect the weep holes
The drain’s weep holes allow water that reaches the liner to escape into the drain. If those holes get packed with mortar, the pan can hold water instead of draining properly. Many installers place pea gravel, weep hole protectors, or small tile spacers around the drain before the final mortar bed goes in.
5. The Corners, Curb, and Drain Where Most Mistakes Happen
In almost every discussion about shower liner waterproofing, the trouble spots are the same: the corners, the curb, and the drain. These are the places where average work starts to separate from professional work.
5.1 Folding corners without cutting them unnecessarily
Inside corners should usually be folded, not sliced open. Clean folds keep the liner continuous. Yes, the folds can feel bulky, but that is normal. This is where stud notching and careful wall prep pay off.
5.2 The outside curb corners need dam corners
This is one detail many DIY installers miss the first time. At the curb ends, where the liner has to transition around the outside corner, you often need pre-formed dam corners bonded in place. These protect one of the most leak-prone spots in the whole shower pan.
5.3 Wrapping the curb without puncturing the wrong side
The liner must go over the curb, but it should not be punctured on the top or inside face. This is critical. The curb sees constant splash and runoff. Any hole there can become the beginning of a hidden leak.
5.4 Why the drain connection deserves extra patience
The drain may look simple, but it is doing serious work. The liner must sit flat at the flange, the clamping ring must be secure, and the cut opening should be neat and controlled. This is not the place for rushed trimming or rough fitting.
6. A Real-World Lesson from a Failed DIY Shower
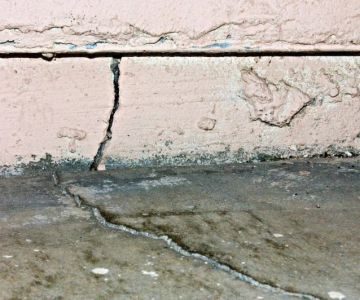
A homeowner once shared a bathroom remodel story that sticks with a lot of people because it is so common. The tile looked beautiful. The grout lines were clean. The new fixtures made the space feel high-end. For a while, everything seemed perfect. Then, less than a year later, the base near the curb started smelling damp, and the trim outside the shower showed signs of swelling.
6.1 What went wrong
After demolition, the issue became obvious. The liner had been fastened on the inner face of the curb, and no proper dam corners had been installed. Water was getting where it should not, and the damage slowly spread to the framing.
6.2 Why this story matters
It is a reminder that a shower can look flawless while failing underneath. Cosmetic success is not the same as waterproof success. That is why experienced remodelers treat liner installation with more seriousness than many beginners expect.
6.3 The bigger takeaway
If you are learning how to install a shower pan liner, the smartest mindset is patience over speed. Most costly failures come from rushing the “hidden” steps because nobody will see them later. Ironically, those are the exact steps that matter most.
7. Testing Your Work Before the Final Mud Bed
Once the liner is installed, resist the temptation to keep building right away. This is the moment to test it. A flood test may not feel exciting, but it is one of the most important confidence checks in the whole project.
7.1 How a flood test works
Plug the drain below the weep holes, fill the pan with water to a safe marked level, and let it sit for the recommended test period required by your local code or inspector. Then check whether the water level has dropped and inspect around the pan and nearby framing for signs of leakage.
7.2 Why skipping this step is a gamble
Once the final mortar bed and tile go in, fixing a liner problem becomes far more expensive and far more frustrating. A flood test gives you a chance to catch problems while the correction is still manageable.
7.3 When the pan passes
If the water level holds and everything looks dry around the perimeter, that is a strong sign the liner is doing its job. Only then should you move on to the final mud bed and the rest of the shower assembly.
8. How to Make the Finished Shower Last Longer
Once the liner is in and the shower is completed, the job shifts from installation to longevity. A well-built shower pan can last for many years, but durability depends on the system as a whole. Good slope, clear weep holes, sound wall waterproofing, and thoughtful maintenance all matter.
8.1 Keep the whole assembly in mind
The liner is critical, but it is not magic. If the curb is built poorly, if the walls are not detailed correctly, or if the drain system is blocked, the shower can still develop problems. Think of the liner as the foundation of a broader waterproofing strategy.
8.2 Choose better materials when possible
If you are still gathering supplies, this is a good time to compare liner thickness, drain components, corner pieces, and shower waterproofing accessories instead of buying the first item on the shelf. Better materials often mean easier installation and more peace of mind later.
8.3 A smart next step if you are ready to build
If you have been researching how to install a shower pan liner and want a shower base that stands up to real daily use, now is the time to look more closely at the liner system, drain parts, and corner accessories you plan to use. Learn more about the options available, compare the features that matter, and choose products that make a truly waterproof installation easier from the start. The right shower pan liner setup is not just another purchase. It is the layer that protects everything underneath it.


 Stewart Plumbing LLC5.0 (79 reviews)
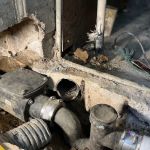 United Sewer & Water, LLC.5.0 (27 reviews)
 Miller's Services4.0 (2596 reviews)
 Quaranti Installations5.0 (12 reviews)
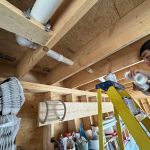 Perti Plumbing & HVAC, Inc.4.0 (58 reviews)
 Willway Services5.0 (105 reviews)
 Ultimate Guide to Low Water Pressure: Causes, Solutions, and Expert Tips
 How to Fix a Clogged Sink: Quick and Easy Solutions
 Beginner's Guide to Replacing Old Pipes | PlumberNear
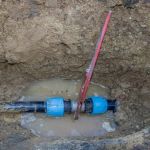 How Long Does It Take to Detect a Hidden Water Leak?
 What You Should Know About Sump Pump Maintenance
 How to Choose the Right Plumbing Materials for Your Home Renovation