
Fixture Shutoff Valve Stuck? Inspect It, Don’t Force It
Quick answer: If a shutoff valve under a sink or beside a toilet will not move with light hand pressure, stop. Do not add a long wrench, hammer the handle, or twist the supply pipe. Check for corrosion, leaks, and movement at the wall, locate a working upstream or main shutoff, protect the area, and arrange repair or replacement before the next fixture emergency.
A local stop valve is meant to isolate one fixture without shutting water off to the whole home. Age, mineral buildup, damaged stems, packing leaks, and long periods without operation can leave it unreliable. The goal is not merely to make the handle turn—it is to keep the valve and connected piping intact.
1. Identify the Valve and What It Controls
Trace the flexible connector or small tube from the valve to the faucet, toilet, dishwasher, ice maker, or other fixture. A sink commonly has separate hot and cold stops. A toilet usually has one cold-water stop. Do not assume a nearby handle isolates the fixture until the piping path is clear.
Observe the handle type. A multi-turn stop usually closes clockwise through several rotations. A quarter-turn lever generally moves only 90 degrees. Some push-pull or specialty valves work differently. If the design is unclear, look for a manufacturer identifier and obtain the correct instructions rather than guessing.

Landry Mechanical Inc Plumbing HVAC & Electric / landry mechanical
FraminghamMiddlesex CountyMassachusetts
763 Waverly St unit 32, Framingham, MA 01702, USA
2. Inspect Before Touching It
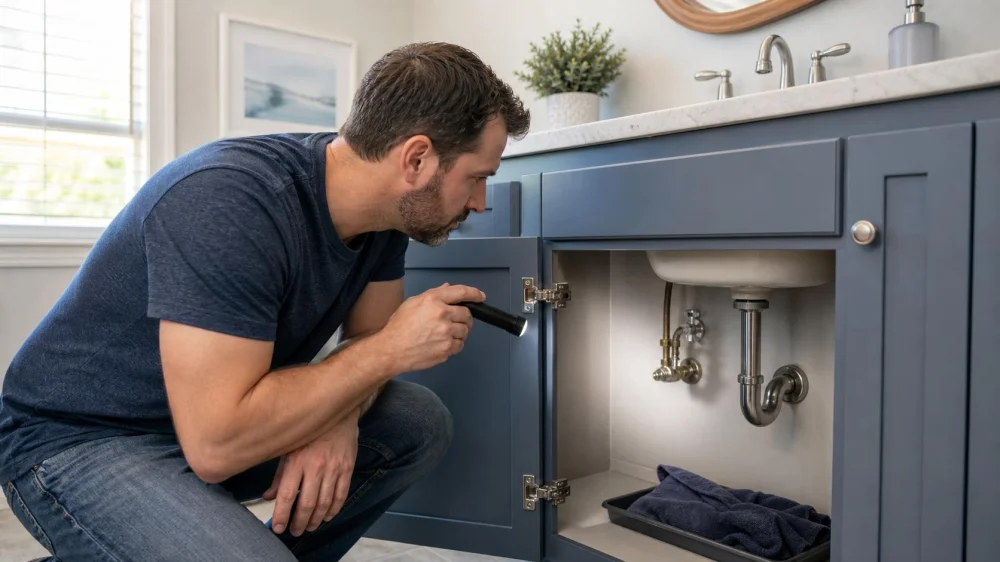
Use a flashlight to inspect the handle, stem, packing area, valve body, inlet connection, wall escutcheon, and supply connector. Look for green or white corrosion, rust, cracks, mineral deposits, dampness, staining, swelling in the cabinet floor, or a tube that moves when lightly touched.
Place a dry paper towel beneath the assembly for a few minutes. A new spot can reveal a slow leak. Do not scrape corrosion or deposits from an old valve; they may be covering an active defect.

Stashluk Mechanical Contractors Inc. / stashluk
Franklin TownshipHunterdon CountyNew Jersey
998 Croton Rd, Pittstown, NJ 08867, USA
3. Use Only Light Hand Pressure
Try the handle only with normal hand pressure and a stable grip. Stop if it does not begin moving, feels gritty, the handle bends, the valve body turns, or the pipe shifts at the wall or floor. An old stop can break or pull a connection loose when leverage is added.
Do not use pliers on a plastic or decorative handle, attach a pipe for extra leverage, strike the valve, heat it, or spray an unidentified lubricant near potable-water connections. Do not loosen nuts while the line is pressurised. “Just a little more force” can turn a planned repair into an uncontrolled leak.
4. Respond if the Valve Starts Leaking
If a slow drip begins around the stem, stop operating the handle and place a tray and towels below. Do not keep cycling it to see whether the leak stops. Locate the upstream shutoff and contact a plumber. If water sprays, the valve body cracks, or the connected pipe moves, shut off the home’s water immediately if you can do so safely.
Keep water away from electrical outlets, cords, appliances, and panels. If water reaches an electrical hazard, do not stand in it or touch energized equipment; call emergency services or the utility as appropriate. Move belongings and start safe drying after the flow is controlled.
5. Confirm an Upstream Shutoff
Before any valve repair, identify a reliable upstream or main shutoff. It may be inside where the service enters, at a meter, in a utility area, or elsewhere based on the home and local system. A street-side utility valve may belong to the water provider and may require a special tool or authorization.
Do not begin disassembly if you cannot confidently stop the water. In a condominium, rental, or shared building, contact the property manager because a riser or building shutdown may affect neighbors. Schedule the repair when access and coordination are available.
6. Plan Replacement, Not a Temporary Gamble
A stuck, corroded, leaking, or non-closing stop is an unreliable safety control. Ask whether replacement is more sensible than attempting to free or repack it. The correct replacement depends on pipe material, size, condition, connection type, access, local code, and whether the inlet piping can tolerate removal.
A quarter-turn ball-style fixture stop may be considered where compatible, but no valve type fixes damaged pipe or a poor connection. A qualified plumber should assess older galvanized steel, brittle plastic, thin copper, corroded fittings, or uncertain materials.
7. Include the Supply Connector
Inspect the connector between the stop and fixture for rust, kinks, fraying, bulges, cracked plastic, mineral buildup, or expired manufacturer service life. Do not twist the connector while testing the valve. A connector that has been disturbed or shows damage may need replacement with a correctly sized, rated part.
Do not reuse a damaged compression sleeve, gasket, or connector simply because it did not leak before. Ask the plumber which connected components will be replaced and whether the fixture inlet also needs inspection.
8. Protect Access and Finishes
Clear cleaners, paper products, and stored items from the cabinet. Photograph the valve and surrounding surfaces, then place an absorbent towel and shallow tray below. Keep a path open to the main shutoff.
Do not cut a wall, cabinet, or floor before understanding where pipes and wiring run. If the stop is recessed, painted over, or inaccessible behind a fixture, discuss a controlled access plan and finish repair with the plumber.
9. Prepare for a Plumber Visit
Share the fixture, valve location, photos, visible pipe material, whether the handle or body moved, and any current leak. Explain whether the main shutoff is known, accessible, and tested. Mention building rules, water-provider coordination, and time restrictions.
Ask whether the quote includes water shutdown, valve and connector replacement, disposal, leak testing, restoration of water, checks at other fixtures, and wall or cabinet repair. After work, request a demonstration of the new valve’s operating direction and confirm that the fixture, connections, and nearby area remain dry.
10. Prevent the Next Stuck-Valve Surprise
Create a home shutoff map showing the main valve and local stops. Label which fixture each valve serves, without covering the body or hiding leaks. Keep the area visible and free of stored products that could trap moisture.
Ask a plumber how often your specific valve types should be inspected or exercised; recommendations depend on manufacturer and installation. Never test a visibly corroded valve without a backup shutoff and leak plan. Include old fixture stops and supply connectors in plumbing inspections before renovations, travel, or appliance replacement.
Decision checklist: trace the line; identify the valve type; inspect for corrosion and dampness; use only light hand pressure; stop if the valve or pipe moves; control any leak upstream; avoid disassembly under pressure; plan a correct replacement and connector check; then verify dry operation.
This article provides general home-maintenance information. Plumbing materials and codes vary. Use a qualified plumber when a shutoff is stuck, leaking, corroded, inaccessible, connected to fragile pipe, or lacks a reliable upstream isolation point.
 Liberty Sewer Drain & Plumbing5.0 (2 reviews)
 T-Mobile LLC Brick Township4.0 (9 reviews)
 A & C Plumbing & Heating Co5.0 (1 reviews)
 Rock Plumbing & Heating4.0 (5 reviews)
 Pro-Plumbing, Inc.5.0 (1 reviews)
 Abba Service Co.4.0 (63 reviews)
 Why Is My Toilet Bubbling When I Run the Sink? Causes and Solutions
 How to Prevent Drain Blockages with Simple Maintenance Tips
 How to Fix a Broken Water Heater: A Step-by-Step Guide
 How to Install a New Laundry Room Plumbing Line Step by Step
 How to Identify and Fix Leaking Pipes Under the Sink
 How to Identify and Fix Plumbing Issues Before They Get Worse