
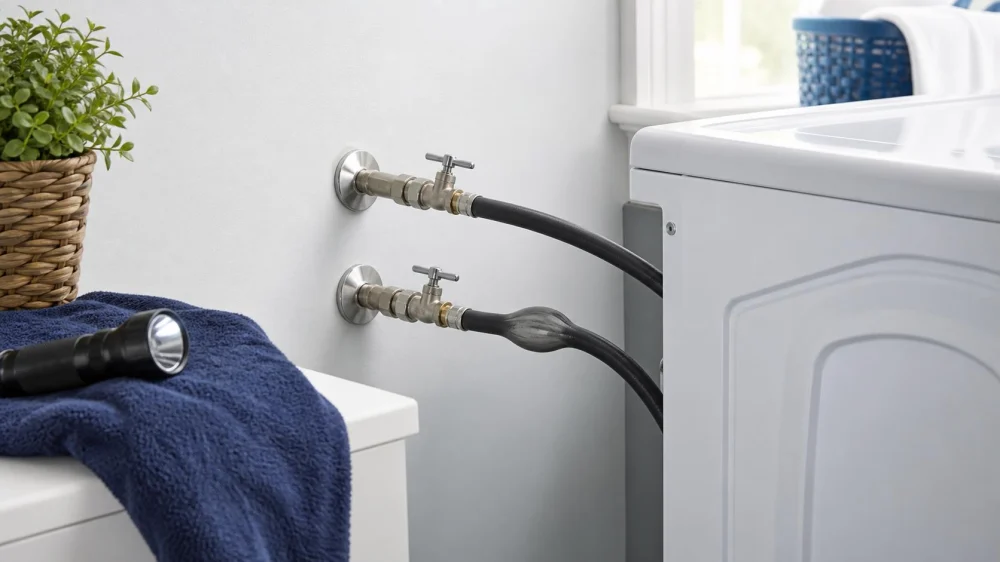
Washer Supply Hose Bulge: Shut Off Water Before It Bursts
On this page
Quick answer
A bubble, blister, split, soft spot, rusted fitting, or active drip on a washing-machine supply hose can become a sudden high-volume leak. Stop the washer, shut both hot and cold supply valves without forcing them, switch off or unplug the appliance if the area is dry and safe, and do not run another load. Arrange prompt hose replacement and valve repair if either shutoff will not operate normally.
Do not squeeze the bulge, tighten a damaged hose under pressure, patch it with tape, or pull the machine while hoses and power remain connected. If water is near electrical equipment, stay clear and shut power at a safe upstream point or call emergency help.

Warrior Plumbing & Heating / warrior plumbing
4123 Roland Ave, Baltimore, MD 21211, USA
Why a bulge needs action
Washer hoses remain pressurised whenever the supply valves are open, even when the machine is idle. A weakened inner tube can expand beneath an outer braid or rubber cover. The visible bubble may be the only warning before rupture.
Age, heat, kinking, tight bends, corrosion, over-tightening, vibration, poor routing, and installation damage can weaken a hose. Braided metal does not make a hose permanent; inspect the rubber near fittings and any discoloured or broken strands.
Go Green Plumbing, Heating, Air & Electrical / go green plumbing heating and air
GreensboroGuilford CountyNorth Carolina
300 Pomona Dr, Greensboro, NC 27407, USA
Shut down safely
- Stop the wash cycle and keep people away from wet flooring.
- Turn the accessible hot and cold valves clockwise or use their designed lever direction, applying only normal hand pressure.
- If a valve leaks, spins, or will not move, do not force it; locate the main shutoff and call a plumber.
- Disconnect power only with dry hands and a dry approach. Never stand in water to reach a plug.
- Place a tray or towels below the connection after pressure is isolated.
For active flooding, close the main water supply if safe, protect electrical safety, and contact a plumber and water-mitigation service. Do not prioritise belongings over electrical or slip hazards.
Inspect without stressing the hose
Use a torch to view both ends, the full hose length, valves, and the rear of the appliance. Look for bubbles, cracks, flattening, chafe, wet mineral tracks, rust, crossed threads, and sharply bent sections. Photograph the routing before anything is disconnected.
Do not move a stacked or heavy machine alone. Pulling forward can tear a short hose, damage the drain, or tip the appliance. Ask a qualified technician when access is restricted.
Plan the replacement
Use hoses approved by the washer manufacturer and suitable for the water temperature, pressure, connector size, and installation space. Replace damaged hot and cold hoses as a pair when age and condition are similar. Do not reuse a crushed washer or visibly corroded fitting.
Choose a length that reaches without tension but does not create loops that kink behind the machine. An automatic shutoff or leak sensor may reduce damage, but it does not replace sound hoses and working manual valves.
Installation checks
Follow the appliance instructions for washers, hand tightening, tool use, and routing. Cross-threaded or over-tightened fittings can leak. Keep hoses away from sharp cabinet edges, hot surfaces, and pinching when the machine is returned to position.
Open valves slowly while watching every joint. Check with dry tissue for seepage, then run the manufacturer’s test cycle while remaining nearby. Recheck after the first full load and again the next day.
Prevent future leaks
Leave adequate clearance behind the washer and inspect hoses regularly with good light. Know where the main water shutoff is and label it. Close washer valves during extended travel only if the valves operate reliably and the manufacturer or plumber recommends it.
Replace hoses at the interval stated by the appliance and hose manufacturers, or sooner for any damage. A calendar reminder and dated installation photo make maintenance easier.
Hose checklist
- Stop the washer and close both supply valves.
- Keep clear of water and electricity.
- Do not touch or patch a bulge under pressure.
- Inspect fittings, bends, abrasion, rust, and routing.
- Use approved replacement hoses and new seals as directed.
- Open water slowly and test while watching.
- Record the installation date and recheck.
Frequently asked questions
Can I finish the current load?
No. A bulged hose can rupture without warning; isolate the water first.
Is stainless braid safe if it has one broken strand?
Treat visible damage as a reason to replace the hose.
Can tape hold the bulge?
No. Tape is not a pressure-rated structural repair.
Should I replace both hoses?
Often yes when they share age and conditions, but follow manufacturer and plumber advice.
What if the valve will not close?
Do not force it. Use the main shutoff if safe and call a plumber.
Can I install hoses myself?
Only if access is safe and you can follow the exact appliance instructions; otherwise hire a qualified professional.
Sources and evidence notes
The washing-machine installation manual and replacement-hose specifications are the primary sources for connector type, routing, tightening, clearance, and test procedures. Local plumbing rules and water-pressure conditions also apply.
A licensed plumber should assess seized or leaking shutoff valves, corroded fittings, pressure problems, inaccessible connections, or recurring leaks. Electrical hazards require a qualified electrician or emergency service.
Conclusion and next steps
Treat a washer-hose bulge as a near-failure: stop the appliance, isolate hot and cold water, avoid electrical hazards, and replace the damaged components before another cycle. Use approved parts, route without stress, test slowly, and keep a dated inspection routine.
 Steve Burke Plumbing, LLC4.0 (5 reviews)
 Fred J. Moyer Plumbing Inc.3.0 (23 reviews)
 PipePulse Plumbing5.0 (3 reviews)
 Mario's Faucet and Toilet Repairs, Drain Cleaners Specialists4.0 (9 reviews)
 Dundee Plumbing & Heating4.0 (24 reviews)
 Petitte's Plumbing Heating & Air5.0 (9 reviews)
 Top Tips for Frozen Pipes
 Best Ways to Fixing a Garbage Disposal: Safe DIY Tips and When to Call a Pro
 How to Know If You Need a Plumbing Upgrade for Your Home
 Estimating the Cost to Replace All Plumbing in Your Home
 How to Protect Your Plumbing System During Renovations
 Why Choosing the Right Pipe Materials Matters for Your Home