
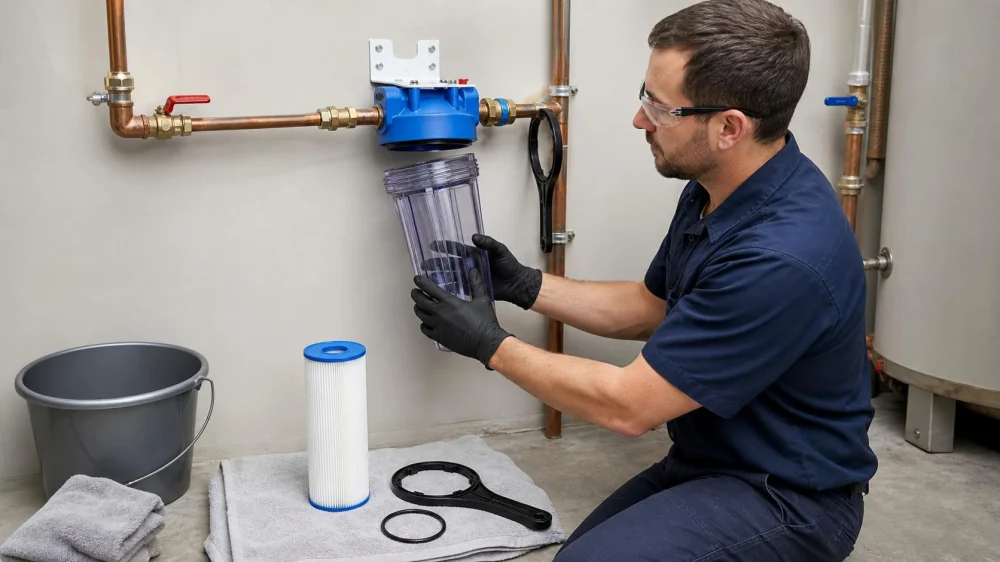
Whole-Home Water Filter Change: Shut Off, Relieve, Inspect
On this page
Quick answer
To change a whole-home water-filter cartridge, first identify the exact housing and approved replacement, shut off water using the designed valves, isolate powered treatment equipment, relieve pressure at the correct control, and protect the area from spills. Open the housing with its proper wrench, clean and inspect the bowl and seal, install the cartridge as directed, then restart slowly, flush, and watch every joint for leaks.
This guide is for U.S. residential cartridge systems, including homes around Boone, North Carolina. Large filters, backwashing equipment, UV systems, wells, pumps, softeners, and treatment for unsafe water need system-specific professional guidance.

Landry Mechanical Inc Plumbing HVAC & Electric / landry mechanical
FraminghamMiddlesex CountyMassachusetts
763 Waverly St unit 32, Framingham, MA 01702, USA
Confirm the system and cartridge
Photograph the housing label, flow arrow, valves, pressure gauges, cartridge number, and existing piping before buying parts. Match diameter, length, micron rating, material, and approved use. A cartridge that physically fits may still have the wrong flow, pressure drop, contaminant claim, or certification.
Know what the filter is intended to do. A sediment or carbon cartridge does not make microbiologically unsafe water safe unless the complete system is specifically designed, maintained, and verified for that purpose. Test water and follow health-department or water-professional guidance when safety is in question.
Hardy Plumbing / hardy plumbing
Port ClintonSchuylkill CountyPennsylvania
149 Penn St, Port Clinton, PA 19549, USA
Prepare shutdown and containment
- Read the housing and treatment-system manuals.
- Choose a time when water can remain off if a seal or part needs replacement.
- Shut off upstream water and isolate downstream flow using the designed valves.
- Switch off pumps, UV units, heaters, or other equipment only as their manuals require.
- Open an approved fixture or pressure-relief control to remove pressure.
- Place a stable bucket and absorbent towels beneath the housing.
- Keep electrical cords, outlets, and controls dry.
Do not loosen a housing that remains pressurised. If gauges do not fall, the relief does not work, or valves will not close, stop and call a plumber.
Replace without forcing parts
Support the housing and use the correct wrench in the instructed direction. Excess force can crack the bowl, bracket, or piping. Once open, note the cartridge orientation and keep dirty water away from the clean side.
- Remove the old cartridge and dispose of it according to local and manufacturer guidance.
- Wash the housing with the approved method; do not scratch the sealing surface.
- Inspect for cracks, clouding, thread damage, corrosion, or bracket movement.
- Remove, clean, and inspect the O-ring only as directed.
- Use only approved lubricant and a compatible replacement seal when needed.
- Seat the new cartridge centrally and in the correct orientation.
- Tighten to the specified hand or tool method; overtightening can cause damage.
Restart slowly and inspect
Restore valves and powered equipment in the manual's sequence. Open water slowly so pressure rises without a sudden surge. Hold the pressure-relief control only as instructed to release trapped air.
Inspect the housing seam, pressure button, drain, bracket, and pipe joints with a dry towel or tissue. A bead of water that returns after wiping is a leak. Shut down and depressurise before reseating anything.
Flush the cartridge for the required volume or time. Carbon fines, air, cloudiness, or taste can occur during startup, but follow the product instructions and do not drink water until the required flushing and any testing are complete.
Record the change
Write the date, cartridge model, batch if available, pressure before and after, flush completed, water appearance, and any seal replaced. Schedule the next check based on manufacturer guidance, water use, pressure drop, and water quality—not calendar alone.
Keep the housing wrench and spare O-ring near the system but protected from dirt. Do not leave tools hanging from piping.
Stop signs and limitations
Call a plumber for a cracked or stuck housing, unsupported piping, corroded bracket, failed valve, persistent leak, abnormal pressure, electrical exposure, or a system connected to a well or pump you do not understand. Do not bypass treatment when water safety depends on it.
Call the appropriate water provider or health authority for a boil-water notice, contamination alert, sewage intrusion, flood exposure, or sudden unexplained water-quality change. A new cartridge alone is not a complete response.
Frequently asked questions
Why is the filter housing stuck?
Residual pressure, overtightening, seal condition, deposits, or bracket stress may contribute. Confirm full isolation and pressure relief; do not extend the wrench with improvised leverage.
Can I reuse the O-ring?
Only if the manual allows it and the ring is compatible, clean, undamaged, and correctly seated. Keep an approved spare available.
Why is the water black after a carbon filter change?
Fine carbon particles may flush from some new cartridges. Follow the exact flushing instructions and do not assume all discoloration is normal.
How often should I change the cartridge?
Use manufacturer guidance plus household use, pressure drop, sediment load, and water testing. A date alone may be too early or too late.
Can I install a finer filter for better water?
A finer cartridge can reduce flow and raise pressure drop. Confirm system capacity, treatment goal, and compatibility with a qualified professional.
Sources and evidence notes
This article reflects common residential filter maintenance: identify the exact cartridge, isolate water, relieve pressure, protect seals, restart slowly, flush, inspect for leaks, and record service. Water-safety claims require a complete verified treatment plan.
Next steps
Photograph your current housing and order the exact approved cartridge and seal before shutting water off. Read the restart and flush procedure, prepare spill control, and make sure a plumber is available if a valve or housing fails. After replacement, inspect again later the same day for a slow leak.
 Catons Plumbing, Drains & Water Cleanup5.0 (116 reviews)
 THE PLUMBING GOD4.0 (331 reviews)
 AP Plumbing Drains LLC4.0 (66 reviews)
 Tewksbury A1 Plumbing Services3.0 (2 reviews)
 MoCo Plumbing, LLC5.0 (414 reviews)
 Quality Plumbers Perth Amboy5.0 (21 reviews)
 Beginner's Guide to Unclogging a Bathtub Drain
 Why Is My Garbage Disposal Humming But Not Working? Troubleshooting Tips
 When Should You Call a Plumber for Clogged Drains?
 What Causes Water Damage in Your Bathroom: Prevention Tips and Solutions
 How to Prevent Drain Blockages with Simple Maintenance Tips
 When Should You Call a Plumber for Water Damage in Your Bathroom? | PlumberNear